
I had the fortune of discussing the security investigation process with Neal Bridges, our CISO, who is also a very hands-on security analyst. Since he is also an Air Force veteran, he loves to apply the OODA loop learnt from his military days to his investigation process. Applying the OODA loop to decision making in a security investigation intrigued me, so I thought I would explore and see how that works out.
Defined as Observe, Orient, Detect, and Act, the OODA loop originated in the US Air Force and has since been widely applied to rapid decision making scenarios in military, business strategy, cybersecurity, and many other domains. In the Air Force’s context, it provides pilots with the foundation for rational decision making during confusing and fast evolving scenarios like a dogfight with enemy aircraft. In SOC scenarios, it is applied to investigate security alerts in an effective and timely manner. It is relevant because the security team is often low on resources/headcount and dealing with more and more complex attacks.
How do we expand visibility, triage, and make decisions faster? That’s where our security data mesh powered by Federated Search comes in. With Federated Search, the alert investigation OODA loop gets faster, more efficient, and effective. Federated Search makes it possible to search security data sources from one place, without needing to move and centralize the data.
OODA Loop for Rapid Investigation of Security Alerts
In our context, OODA loop is less about dogfighting the enemy aircraft and more about dogfighting, i.e. triaging an alert. Why OODA? Because time is of essence. Quick decision making is often needed to identify and contain a potential breach. The faster you can complete this loop, the more likely you can prevent/detect a breach, and/or contain it before any lateral movement. Also, the OODA loop provides the framework to learn from past decisions – have we seen this kind of alert before, what did we do then, did that work out, why/why not?
Step 1: OBSERVE – An Event of Security Significance Has Happened
Imagine this: you, a security analyst, are sipping your third coffee when an alert pops up through your SIEM pointing to suspicious outbound transfers on an organizational device. The alert gives you a hostname, severity, date, and time, with a tantalizing hint of suspicious or even malicious activity. All you know at this point is that someone or something potentially nasty could be lurking on a device that your organization owns.
Assuming you (or your admin) have connected an awesome security data mesh like Query to your data sources, you are ready to get started. If a particular data source is not connected yet, ask the admin of that platform to provide you with read-only credentials so that you can search its data. (For example, if your EDR logs are copied to S3 buckets, you need an AWS IAM role that permits querying.) Enter those credentials in Query to set up a connection.
Regardless of what data source the alert came from, Federated Search gives you a centralized way to observe all your alerts, without needing to centralize the data.
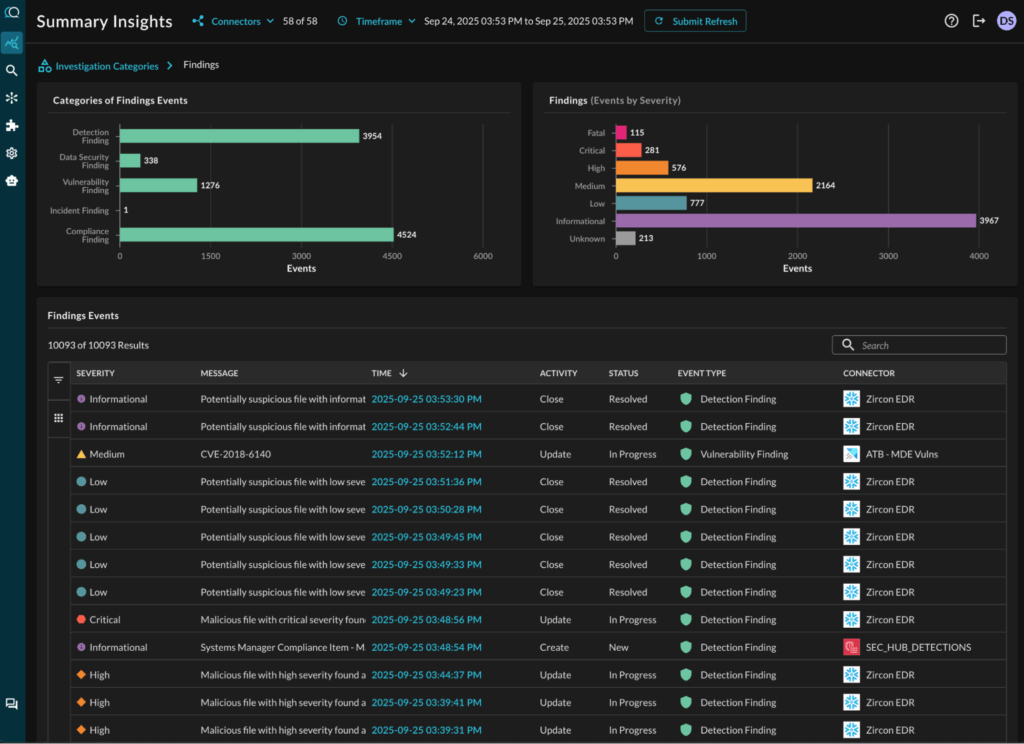
Whether you start your investigating from an alert, or from an IOC in your environment, Query lets you observe:
I can OBSERVE!
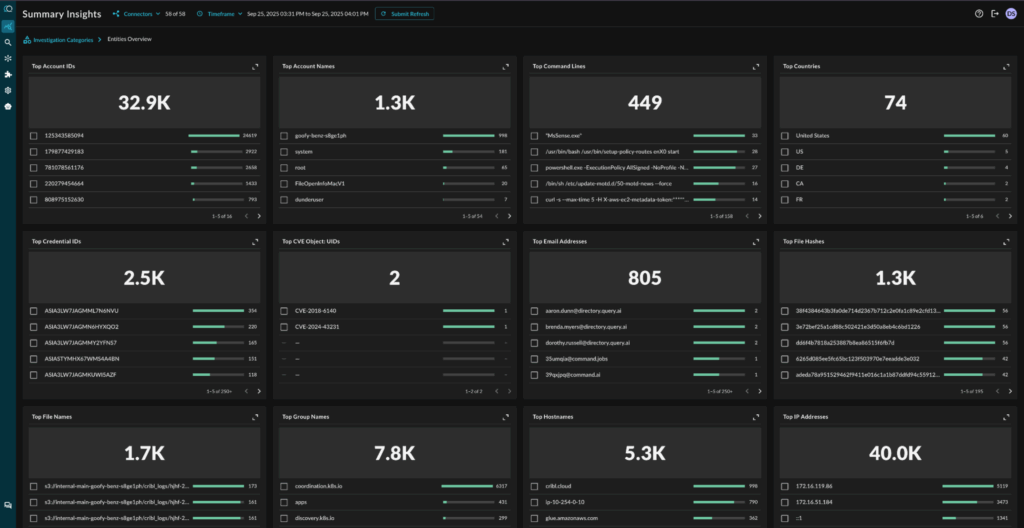
In my setup above, I had Query connected to 58 different data sources. If I had not used Query, I would have had to open a large number of browser tabs. I couldn’t have used a SIEM because (a) it may not see all this data because it gets too expensive to move data into it, and (b) it only gets a log subset vs. the high-fidelity context that is held at the source. (On the latter point, compare CrowdStrike process activity data, for example).
Some key data sources I connected as part of my 58 sources Federated Search above (you can almost draw parallels here with how the military operates!):
- EDR: the frontline soldier, detecting threats right where they live—at the endpoint.
- Threat Intel: the intelligence coming from the spy network!
- Cloud provider account(s): connect to our assets and infrastructure.
- User identity platforms: who is having what roles and responsibilities and deployed where, and to do what.
- Asset Inventory: Know thy enemies, but know your assets first! What are our crown jewels that we need to protect?
- And many more…
Step 2: ORIENT – Triage With Style
This is the Orient stage — you will spend the bulk of your time here. This is where you will triage all the information, connect the dots, and pivot, often multiple times. As part of orienting yourself, you have to consciously be careful of your assumptions and biases.
On an average, organizations have very high MTTD and MTTR (Mean Time to Detect / Respond). Applying the OODA framework using federated search can make a dent in military style!
Let’s take the example of a CrowdStrike alert indicating presence of a malicious file on a device. Searching for that device IP/hostname, Federated Search will fetch the following information from various platforms:
- OCSF normalized Detection Findings for that device, both from CrowdStrike and other sources.
- Device owner, along with owner/device role, from AD/identity platforms and CMDB/HRMS.
- Get the device’s vulnerabilities from prior scan results in VMS.
- The analyst can review and select the file hash and perform a pivot search to see what other devices might have that file.
- What is the threat Intel from TIP platforms for the file hash.
- The analyst can select and pivot over the process name or the MAC address, to follow up the investigation chain.
- What URL was the file downloaded from. Federated Search for that URL (web proxy data) to see who else went to that URL.
If you try to automate this orientation part of the OODA loop using a playbook, be careful (see here for more on automation pitfalls). Orientation does need human review (but feel free to take some help from Query Copilot – you will be impressed!). Federated Search already applies a lot of automation to do the grunt work on your behalf:
- Automatically translates queries into native platform syntax
- Runs them in parallel with an optimized query plan
- Normalizes results into a common security data model (see OCSF)
- Merges and visualizes results from all your data sources
- Copilot helps you understand and orient
- You can pivot / follow up for additional context
Now that’s what I call triage with style!
Also, while we got into a broader investigation, using Federated Search has saved a lot of time and made it even practical to do it with this greater visibility in less time (see this whitepaper).
With the above work done so far in our example scenario, we are now well oriented with our 58 data sources and ready for some decision time…
Step 3: DECIDE – Evaluate the Evidence
After getting oriented with the earlier searches and pivot searches, we are ready to compile and review results and make some decisions. In our example scenario, that single CrowdStrike alert for one device has led us to an investigation with multiple searches and pivots that has uncovered a significantly broad blast radius (again in military terms!):
- 7 devices executed the malware
- 19 additional devices were found with it but are not vulnerable
- 438 additional devices are vulnerable
Following the OODA loop led us to this. Otherwise, we would have likely missed the broader impact and only acted on that single device.
Before we move to the action phase, another decision we have to make is to prioritize the followup action. So identify which ones are high-impact/production users/devices and act on them first.
Let’s move to the action phase now.
Step 4: ACT – Remediate and Conditionally Automate
For the final ACT of the OODA loop, we line out our work in priority order. We need to:
- Immediately establish a blocklist/quarantine infected devices
- Close monitoring of exploit activity
- Clean up the impacted high-priority devices (wipe, malware removal)
- Patch/update vulnerable high-priority devices
- Repeat patching/cleaning of remaining devices
We have completed our OODA loop now. It’s a good idea to take some time to reflect on pitfalls to avoid and how to improve.
Pitfalls To Avoid When Implementing the OODA Loop
The military’s OODA loop gave us a good framework. But here are some things we should watch out for:
- The OODA loop provides a good process framework, but is not a solution to all problems. You need to invest in suitable talent, training, technology, and resources. Also do continuous review and improvement.
- Complement it with an agile methodology (e.g. scrum, kanban) and have a system to track.
- You need broader visibility than what your SIEM gives you. This is even more so with so many cloud data sources and SaaS apps.
- Don’t expect that you can fully automate security investigations. Smart automation that brings in human decision makers at adequate points, is the right mix, as we talked above.
- Last but not the least, reach out to us for help building your security data mesh. Beyond the federated search capabilities, you would really appreciate and benefit from a common security data model to make sense of disparate data. Centralize your actions, not your data!
If implemented well, you will greatly benefit from the MTTD/MTTR improvements that the OODA loop and federated search will bring.
Interested in learning more about how Query can help improve your SOC productivity? Reach out and connect with one of our security data operations experts.